Okay, so, I’ve always loved baking, especially during the holidays. Thanksgiving is no exception! This year, I decided to dive into making some festive sugar cookies. Not just any sugar cookies, but ones decorated with that extra Thanksgiving flair. I figured, why not share this little adventure with you all? It was quite the ride, and I learned a ton along the way.
Getting Started
First things first, I needed a solid sugar cookie recipe. Something that would hold its shape, taste great, and not turn into a crumbly mess when I started decorating. I did some digging around and finally settled on a recipe that seemed simple enough. I gathered all my ingredients: flour, sugar, butter, eggs—the usual suspects. Mixing everything together was pretty straightforward. The dough came together nicely, and I popped it in the fridge to chill for a bit. This step is crucial, by the way, if you want your cookies to keep their shape.
Shaping Up
Once the dough was nice and cold, it was time to roll it out and start cutting shapes. I had these adorable cookie cutters—turkeys, leaves, pumpkins, the whole Thanksgiving lineup. It was pretty fun, actually. I placed the cutouts on baking sheets, making sure to leave some space between them so they wouldn’t merge into one giant cookie. Into the oven they went, and I kept a close eye on them because over-baked sugar cookies are a real bummer.
Decoration Station
Now for the fun part: decorating! I whipped up some royal icing—just powdered sugar, some meringue powder, and water, basically. I divided it into different bowls and got to mixing in colors. I went with classic fall shades: orange, brown, yellow, and a bit of red. Getting the right consistency was a bit tricky. Too thin and it runs everywhere, too thick and it’s hard to work with. After some trial and error, I got it just right.
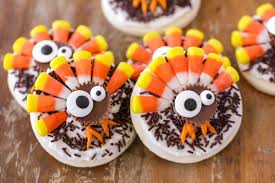
I started with outlining the cookies with a slightly thicker icing, creating a border. Then, I flooded the inside with the thinner icing. This part was so satisfying. Watching the icing smooth itself out was like magic. For the turkeys, I got a little creative. I used some mini pretzels for the tail feathers and added some chocolate sprinkles for texture. They turned out pretty cute, if I do say so myself!
The Final Touch
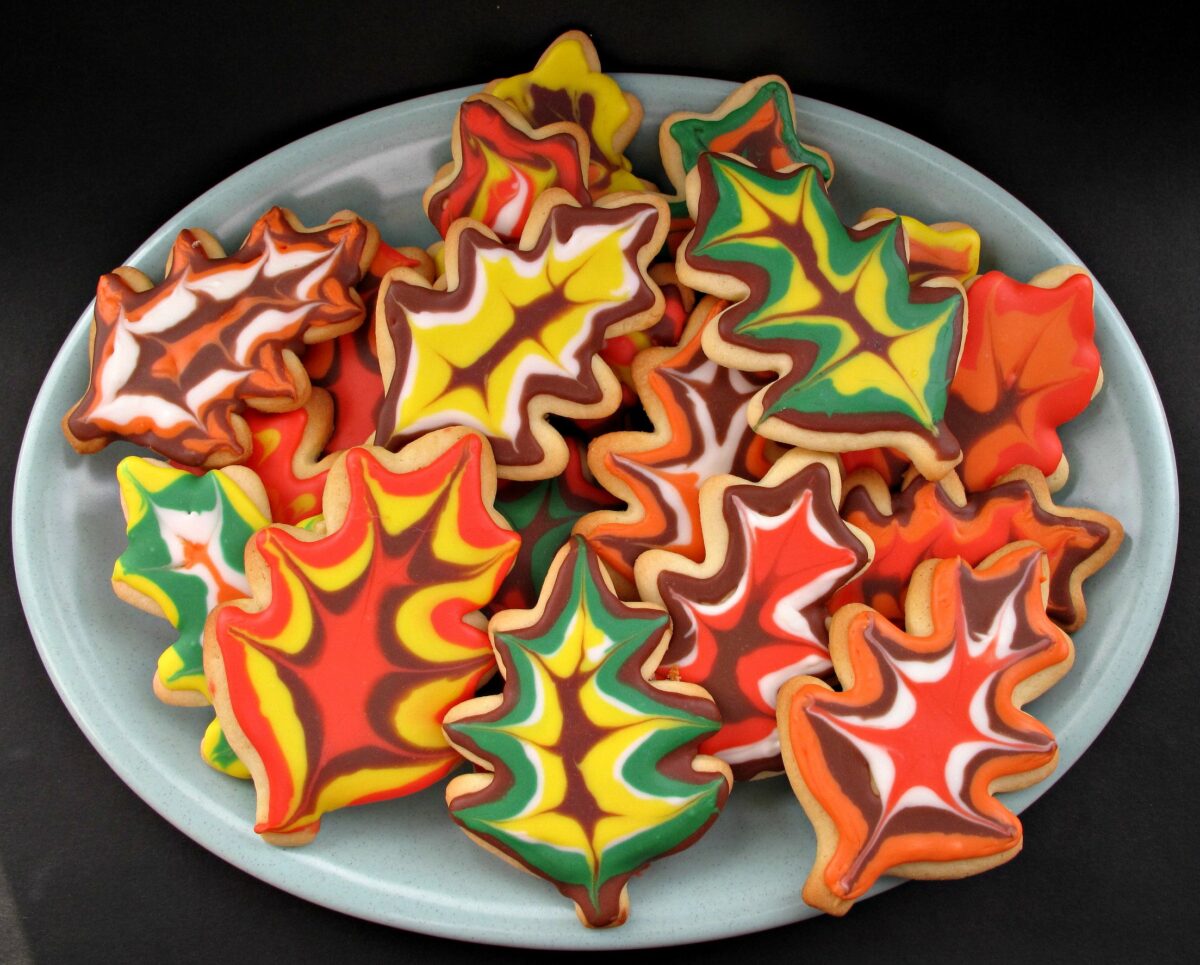
For the leaves and pumpkins, I decided to try a wet-on-wet technique. I flooded the cookies with one color and then quickly added dots or lines of another color, swirling them together with a toothpick. It created this cool, marbled effect that looked really professional. I was pretty proud of how these turned out. I let everything dry overnight, just to make sure the icing was completely set.
- Tip 1: Don’t rush the chilling process. It really makes a difference.
- Tip 2: Play around with the icing consistency until you find what works best for you.
- Tip 3: Get creative with the decorations! There are no rules here.
The next day, the cookies were ready to go. They looked amazing and tasted even better. Sharing them with my family was the best part. Seeing everyone enjoy something I made from scratch was such a great feeling. It was a lot of work, but totally worth it. I’ll definitely be doing this again next year, maybe with even more elaborate designs. If you’re thinking about trying your hand at making Thanksgiving sugar cookies, I say go for it! It’s a fun and rewarding experience, and you get to eat your creations at the end. What’s not to love?
Alright, that’s my Thanksgiving cookie adventure in a nutshell. Hope you enjoyed the ride! Feel free to try out the recipe and let me know how it goes. Happy baking!


Post Comment